Tuesday, April 29, 2008

A Little Cookie For The Weekend


I love everything coconut, especially macaroons. This recipe comes from the April 2008 issue of Every Day Food and was super simple and delicious. The aroma wafting through the house took me to a warm tropical island. I'm so ready for summer!

I couldn't help myself from picking off the crispy bits of coconut that stuck to the parchment paper and nibbling them. And I do recommend using parchment paper with these ones, they are sticky! The apricot lent a subtle fruitiness that I enjoyed. Although if you left it out, it would still be a great macaroon. I imagine that bits of dark chocolate mixed in would make these extra divine.

Coconut-Apricot Macaroons

3 large egg whites
1/2 c sugar
3/4 t pure almond extract (optional)
1/4 t salt
14 oz sweetened flaked coconut
1/2 c soft dried apricots, coarsely chopped (3 oz)

Preheat oven to 325. Line a baking sheet with parchment

In a large bowl, whisk together egg whites, sugar, almond extract and salt until frothy. Add coconut and apricots; mix to combine.

Using your hands, shape mixture into mounds, equal to about 2 Tablespoons; place 1/2 inch apart on baking sheet (macaroons will not spread).

Bake until golden brown, 35-40 min (my oven may be off, but mine only took 25 min total), rotating half way through. Transfer to wire rack to cool. Store in an airtight container at room temperature for up to 1 week. Makes about 20.

*Rebecca, you gotta make these!

It Was A Sunny Weekend!


The kids played in the sand box,


and blew some dandy lions.


It takes total concentration.


The chickens scratched and pecked, like they always do. See the red beak? That's from a beet, looks kind of gory. She does have an evil look in her eye... Attack of the chickens!


Wren climbed a tree, much to his delight


And I noticed this! I can't wait for them all to bloom so the air will be filled with their luscious aroma.

Amongst all this lovely weather, Denny was sick in bed. Poor guy. Now, the rain is back and Wren is sick. I'm glad he got to enjoy the sun.

Tuesday, April 22, 2008

'S' Is For Sewing: part 2

After Wren finished sewing the little guy for his friend, I went about making the second part of the gift. I have been wanting to try appliqués on t-shirts using fusible webbing.

What kid doesn't want a t-shirt with their initial on it? I found a font I liked, enlarged it and printed it out. I used a water soluble fabric pen to trace the letter onto the fabric, pinned the fabric and the webbing together and then cut it out. Then I placed it on the shirt and with a hot iron, fused it into place. How easy is that?


It could be finished at this point, but I decided I liked the look of a sewn edge. I don't have a special needle for knit fabric, but since I was sewing through two other layers, it went along smoothly.


This whole process took about 20 minutes! Why didn't I try this before?


Now I need to make a 'W' and a 'V', how about a butterfly? or a truck? The possibilities are endless!

'S' Is For Sewing: part 1

I was inspired when I read Linnea's post about her son's first sewing project and wanted to see if Wren might be interested in giving it a try.

I thought I should start with something where the stitches were visible and it wouldn't be too hard to poke though, plastic canvas fit the bill.


Both of the kids had fun 'sewing' and Wren was eager for more!

"I want to stuff something!" Wren declared. So we set about making a little stuffed guy that he could give to a friend for his birthday. He really enjoyed drawing the circles and cutting them out. And he was very ambitious when he started sewing the circles together. But after just a few stitches, he was ready for something new.

"Well, you could finish it" he said, as I reminded him we needed to sew it together before we could start putting the eyes and mouth on. I encouraged him to do a few more stitches and finished the rest. Stuffing and decorating were right up his alley though and I think his little guy turned out pretty cute.


Violet went right to work trimming pompoms.

Sunday, April 20, 2008

The Wrap Skirt


I finally got a picture of the wrap skirt that I made from a pattern from Craft Magazine. I've worn it a few times and I'm very pleased with the fit.

The rest of this lengthy post is my account on how this skirt came together. This was quite a learning process for me and I'm hoping that my experience will help anyone else out there that is going to make this skirt. So, unless you are going to try this pattern, you might not want to go on, it's quite wordy!

Here's my story, and I'm sticking to it.

The pattern comes as a PDF file with two download choices. I opted for the 49 page tiled version. The number of pages was a bit over whelming! But once they were printed, I realized that they were all the pieces for both the beginning and the advanced pattern. I only needed to work with the pages for the beginning pattern. I began by laying all the pages on the living room floor and pieced them together. Once they were lined up correctly, I carefully taped them and cut them out.

The next hurdle was figuring out how to enlarge the pattern to fit my waist. I followed the instructions given and had the measurement needed, but how was I going to enlarge the pattern? What I ended up doing was cutting the pattern pieces along the adjust for width line. Then, placing paper behind the pieces, I measured the space between to equal the measurement I needed to enlarge it to and taped it in place. Continuing along the length of the pattern on both pattern pieces.

When I measured the finished pieces, they came out to the exact measurement that I wanted the finished skirt to be. I decided that I would trace the pattern, cut an extra seam allowance and sew directly on the line I traced.

The instructions aren't very clear on how to cut the pieces out of the fabric. I'm used to having the fabric folded in half and placing the pieces on that way. But the pattern pieces for this skirt are very large and didn't fit on the folded fabric. I laid the fabric out flat and started to arrange the pattern pieces, making sure that the grain lines matched the grain of the fabric and then traced them with a water soluble fabric pen.

Here is where I came into a bit of trouble. I needed to cut out mirror images of each piece. This happens automatically when you cut out of folded fabric, but since I had laid the fabric out flat, I needed to cut one facing up and one facing down. This didn't occur to me until after I had cut the pieces out and started sewing. Luckily I had given myself a large seam allowance and was able to retrace them.

WHEW! That was a lot to say!

From here, things got much easier. I just followed the instructions and it all came together pretty fast.

After all that work, I now have a pattern for a skirt that fits me perfectly! Next time, I will go with the button closure instead of the ties though.

Also, if anyone who has made this skirt has tips for doing this a better way, I'd love to hear them!

Friday, April 18, 2008

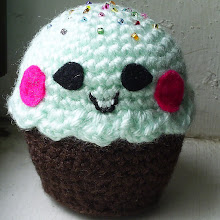
Mint Chocolate Chip With A Cherry On Top (and a little amigurumi love)


This one is for a good friend of mine that has been waiting patiently for me to crochet her a cupcake. I hope she likes it.

These are seriously so fast and fun to make. It just takes a couple of hours, you've got to make yourself a cupcake.

I first started making cupcakes when I discovered the world of Amigurumi. I got sucked into site after site of adorable little creatures and oh, the food!

Here are a few of my favorites:

Crochet Me has a tutorial on how to get started with your own little Amigurumi dude, including how to crochet in the round and how to make an adjustable ring.

Ana Paula has some super cute patterns in her Etsy shop.

I love this tiny bear on the Amigurumi Along site.

Planet June sells lots of fun patterns for dogs and other animals.

You have got to check out Gourmet Amigurumi. Elisabeth Doherty creates the most amazing creatures and has a book sharing some of her patterns.

Stitch shares her pattern for a very cute Amigurumi Doll.

Hopefully that's enough to get you started, be careful, its addictive!

Wednesday, April 16, 2008

What's For Dinner?

Last night we had Cobb Salad. This is a wonderful family friendly meal because each person can create their own. I made sure that the choices included something that each person likes.


The ingredients:
chicken
diced tomatoes
hard boiled eggs
avocado
turkey bacon (for the hubby)
real bacon (for me!)
blue cheese crumbles
romaine lettuce


My salad, I like everything!

The kids ate their's with ranch, but I made a more traditional Cobb Salad dressing from this recipe for the adults. I loved this dressing! I want to make a blue cheese, pear, walnut salad and use this dressing.

The kids really enjoyed building their dinner and Denny told me that it was the best salad he'd ever eaten. One gold star for me!

I Love Getting Packages...

Look what I got! I placed an order over the weekend from Roxanne's etsy shop Feminine Addictions and it has already arrived.


The pendant came in a sweet little coordinating package with a matching tag as well. I love the cherry and polka dot fabric, it is also nice and sturdy, so it will make a great bag.


The back of the pendant has a flower illustration and the flower parts written in shorthand. Perfect spring wear!

I think I need to buy stuff for myself more often!

Tuesday, April 15, 2008

GAK!

Here's something fun to make with the kids. Its easy and fun, and a bit scientific.


The ingredients, Elmer's Glue, liquid starch and food coloring.


Pour 1 c Elmer's glue into a bowl, then mix in the food coloring.


Pour in 1 c liquid starch and start stirring.


This is where it gets fun, when the two mix, they start to get thick.


Pretty soon it turns stretchy.


Violet is looking a little bit concerned.


After a bit more stirring, it all comes together into a solid mass. It is sort of stretchy, sort of gooey and lots of fun.


A few notes:

If it seems too sticky, mix in more starch.

It does stick to clothes and the carpet. Don't worry, it comes out easily in the wash or with warm water and a bit of rubbing. You might want to keep it on a tray or in the kitchen. Wren stuck a glob on his head once, AHH! I just stuck him in the bath and it pretty much dissolved with warm water and a wash cloth.

Not all glue is equal. Elmer's is the best, and glue you get from school supply stores works. But the glue I bought at the dollar store did not work!

Gak should last for a month or so if kept in a tight container.

Saturday, April 12, 2008

The Cupcake Gang

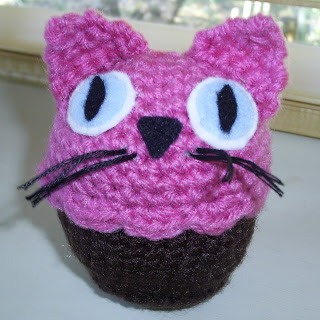
I purchased some crochet patterns from anapaulaoli.etsy.com, she has some seriously cute stuff, and along with my patterns she included this super cute cupcake pattern that she offers for free on her blog as well.

So, I totally went to town and I made all the birthday kids a personalized crochet character cupcake. It was so fun thinking of each child, trying to create something just for them.


This was last year. Its birthday season again, and I've got my work cut out for me. I've got some sewing projects going and I want to make some appliquéd t-shirts. I was thinking initials would be fun. And I'll probably try making some more softies!

Wednesday, April 9, 2008

Endulging The Craving: Carrot Cupcakes


I just needed to make them, Carrot Cupcakes with Cream Cheese Frosting.

Wren saw me peeling the carrots and was intrigued. What was I doing? Why was I doing that? Could he do it too? I set him up with some carrots and the peeler and he diligently sat and peeled. "Look mom! I can do it! I'm getting all the parts!" I really wish I could post all the pictures I took. It's amazing how he was sitting in one spot, completing his task, but not actually sitting still!


He actually wanted to peel the whole bag, but then decided that he would eat one of the carrots he so carefully worked on.

As I was putting together the food processor, I discovered that the piece that attaches the shredding blades was no where to be found! So I ended up grating them all by hand with my handy little grater from IKEA. It was quite meditative, actually. I sat and pondered life, my mind wandering. I remembered Diane from CraftyPod commenting that she is a "total process-crafter" and at the time I didn't quite get what she was talking about. But it was starting to make sense to me. I'm all about the process when it comes to cooking and baking. I love to knead bread with my hands, make chicken stock from scratch, I don't mind grating carrots by hand on occasion. The rhythm becomes my mantra clearing my mind of all worries, at least for the moment. Then the task is completed and life rushes back in.


The cupcakes did hit the spot. They were moist and not overwhelmingly sweet. I wont feel bad at all eating some for breakfast tomorrow.

Sunday, April 6, 2008

Dot - Prototype #1

Here it is! My first attempt at turning my sketch into a real toy.


Here is the sketch again, for comparison.


I think its pretty good for the first try. Although, she looks more like a cross between Humpty Dumpty and an M&M than what I'm going for. Wren said it looks like an astronaut, I can see that. Actually, his vision is closer to what I want the finished toy to look like.


I am pleased with how the face came out though. I was reading FutureGirl craft blog and read about her method for tracing a picture on to tear away stabilizer and then embroidering over the top. Brilliant! I used tissue paper from our stash of wrapping supplies and it worked great.

Alright, back to the drawing board, I need to write down my thoughts for changes before they get lost in the chaos that is my mind.

Saturday, April 5, 2008

It's MY Day!

Or is it?

I've got laundry going, I'm working on a birthday gift for Wren's friend and I'm getting a pot ready for some chicken stock. These days, my time usually gets used up doing the things that need to get done. But that's OK, it makes me feel better getting to check stuff off of the 'to do' list.


I'm actually excited about what I'm making for the birthday present. This is a sketch I did a while ago and it is now coming to fruition. I've made a pattern and I'll soon be done with my very first one. Minus the antennas though, I'm still figuring out how to make those work.

After all this, I'm really going to do something for myself. I'm going to finish my wrap skirt and wear it out tonight to an art opening at a friend's café. Hurray!

Thursday, April 3, 2008

Signs of Spring

We moved into our house in the middle of December, so when Spring came, I was thrilled to discover that our back yard was filled with lilac trees. My grandparents had a row of lilac bushes lining their yard, I have such great memories of playing there. Lilac has always been one of my favorite scents and I'm sure it's because of those fond memories.


I discovered these buds yesterday and I'm crazy with anticipation.


Another sign of spring, our Buff Orpington has gone broody. Poor girl wants to hatch some chicks. She's the most instinctual of our hens, so I'm not surprised by her behavior, but I don't quite know what to do. I feel bad knowing that her efforts are all in vain.


Here's one of our other girls trying to squeeze her out so she can lay an egg.

On another note, we are still trying to get back into the groove after our Easter vacation. Wren really misses having his dad around all day, it's so nice how much he loves his dad!

So, this week has been more about getting through it than getting caught up. I'm hoping to get some time this weekend to devote to me!